Like many, I first read Zen and the Art of Motorcycle Maintenance while in my early 20s, when the open road was a constant call. But I was far more enthralled by the careful attention to mechanic workings the book presented. Still am. Yesterday I began the process of servicing a suspension fork, easy enough, but something that requires concentration, awareness, and that awards not just a plush fork but immense satisfaction. I re-read this article before I began working on the fork and we decided to share it again. – Ed.
Way back in high school, I got a job at a local bike shop. I was quickly placed under the supervision of the head mechanic, a guy named Jeff who sported big sideburns and yellow Converse All-Stars. Once I earned his respect, he became an absolutely incredible mentor in wrenching and in life. What I learned from him over the course of four years, everything from wheel building to mechanical problem-solving to frame repair, has proven absolutely invaluable in helping both prevent and fix all manner of problems on backcountry rides and bikepacking expeditions.
Solutions to the most challenging scenarios that would have made Jeff proud presented themselves. Crank arm keeps falling off? Shim it with a bit of a soda can. Damaged air seal in a rear shock? Shrink it ever-so-slightly with a lighter. Cracked chainstay? Splint it with rebar and baling wire.
End-of-the-day drivetrain maintenance goes a long way toward keeping things clean and running smoothly.
But not everyone was as fortunate to have had a mentor as stellar as Jeff. So many cyclists have minimal background in working on their own bikes, and the prospect of encountering mechanical problems deep in the backcountry is intimidating. I want to share a bit about what can be done to minimize those concerns – preventative maintenance, carrying the right spare parts and tools (and knowing how to use them), and what basic repair tasks are important to be able to do. More substantial bike problems may not be repairable in the field, and then limping out and hitchhiking is the likely outcome. But most of the time, mechanical problems don’t need to mean the end of the ride.
Perhaps the easiest way to avoid significant bike problems in the backcountry is to make sure that a bike is in good working order before striking out on the trail. Give the bike a quick once-over. Check all the bearings for play, slop, crunchiness, or excessive friction – the crankset/bottom bracket, hubs, headset, and pedals. Often times, looseness in any of those bearings will create a rattle, so bounce the bike on the ground firmly and listen for any rattles. Also check for any play or rattle in suspension forks and rear suspension linkages. Spin the wheels, check for roundness, and feel all the spokes to make sure none are notably loose. Look over the tires for any signs of damage. Inspect brake lines and shift cables and housing for any damage, kinks, or cracks. Run through the shifting to make sure that the derailleur(s) are functioning properly. Peer into the brakes to verify that the pads have ample material remaining. Check all the bolts on the bike for snugness, and if you have a chain checker, see how much life is left in the chain. If anything abnormal shows up in these checks, take care of it before the ride.
Once out on the trail, a happy bike will continue being so with some general regular maintenance, and this becomes critical on multi-day trips.

Learning how to address tire problems is far easier in a workshop than in the snow.
I check tire and shock pressure every morning, just by feel, to make sure that nothing lost air overnight. I carry a rag and stiff brush to keep the drivetrain as clean as possible and use both every time I lubricate the chain. I also look over the bike quickly at least once a day, checking almost everything mentioned above. And if anything on the bike starts sounding or feeling notably different from normal, I stop right away to diagnose the problem. Usually, it’s just something like a webbing strap bouncing along on the tire or something hitting the frame. But occasionally, a rattle has turned out to be something a bit more problematic like a missing brake caliper bolt or a broken spoke.
For more remote backcountry rides and bikepacking adventures, my tool and repair kit is larger than what I carry on normal day rides, but it’s still relatively small. Here’s what I would recommend carrying:
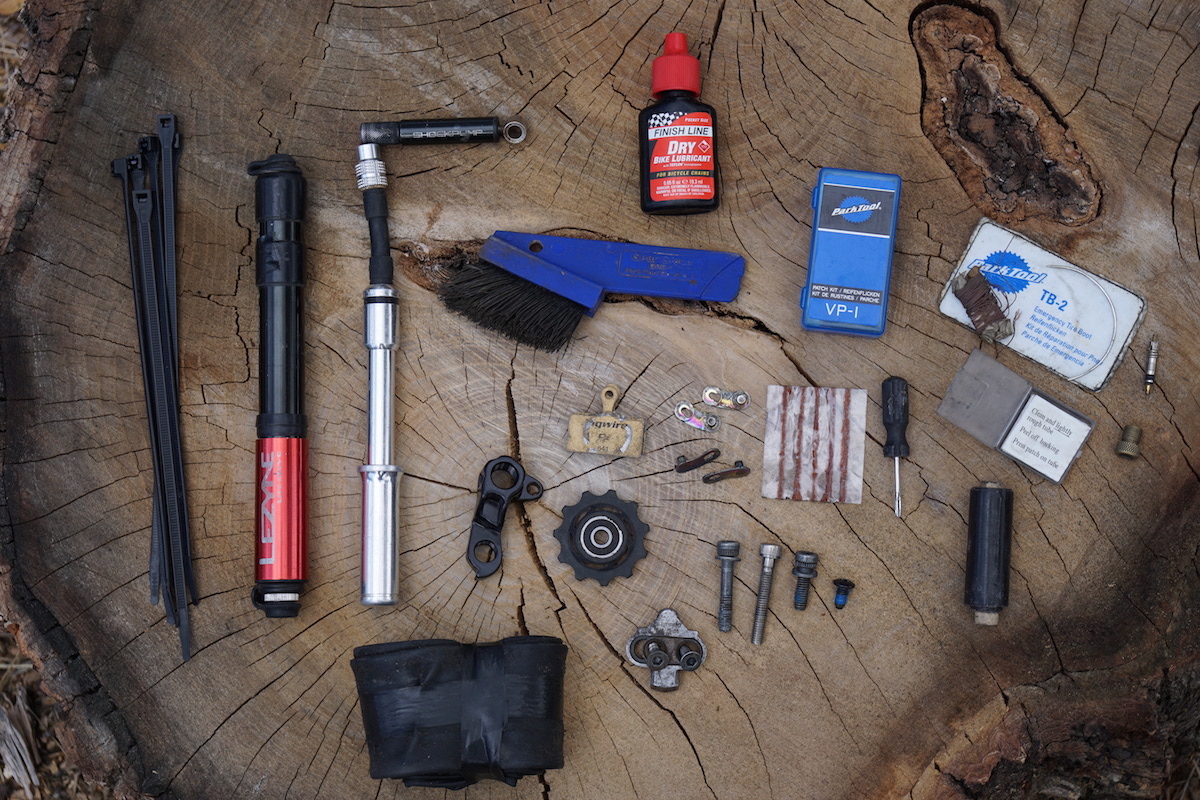
The contents of Kurt’s typical bikepacking repair kit.
• A bike multi-tool (with chain breaker) that both fits and reaches every bolt on my bike – I particularly like the very functional Blackburn Big Switch and the Crank Brothers M19 and F15 tools
• Another small multi-tool with a knife, file, and pliers – this is useful for everything from making dinner to sewing tires to removing a valve core
• Tire pump – the Lezyne Pressure Drive (the small model) is very packable and can be used to inflate suspension up to 120 psi
• Small shock pump – the Birzman Zama is my current favorite, but there’s a soft spot in my heart for my minuscule but still effective 4” pump scavenged from an old Blackburn Toolmanator multi-tool
• 1-2 tubes depending on the length of the trip
• Tire lever
• Tire plugs
• Small roll of Gorilla tape
• Thick needles and upholstery thread
• Spare valve core or stem
• Presta valve adapter – good for re-seating tubeless tires at gas stations
• 10+ glueless patches; for colder trips with temperatures <40 °F, glue-on patches are better far more reliable
• 2 Park self-adhesive tire boots
• 1-2 pairs of spare brake pads
• 5+ thick zip ties
• 2-3 quick links and an extra bit of chain
• Spare derailleur hanger
• RockShox Enduro Collar or Wolf Tooth Valais Clamp if running a dropper post, just in case the dropper refuses to stay up
• Spare cleat and mounting bolts
• Chain lube, cleaning brush and rag
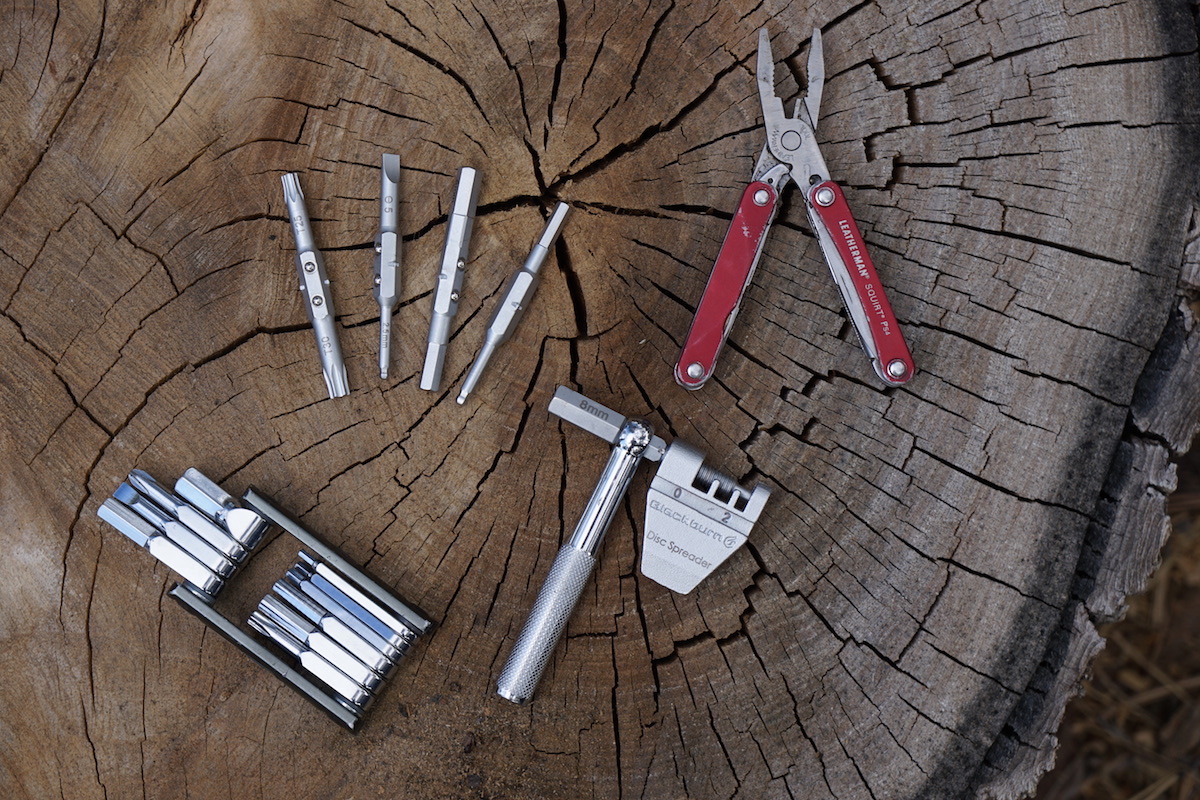
A few of Kurt’s favorite multi-tools – the Blackburn Big Switch and the Crank Brothers F15
For longer or more remote trips, I also will consider adding in the following:
• Spare brake caliper bolts (these rattle out occasionally)
• A few other miscellaneous bolts specific to my bike
• Spare derailleur pulley and shift cable (for really long trips)
• 2 spare spokes with nipples (taped to seatstay)
• Small bottle of tire sealant (for long trips only)
Razor sharp limestone sure left a mark, but stitching up and booting this tire was all that was needed for getting through the final 2 days of the trip.
Flat tires are by far the most frequent bike problem faced by many mountain bikers. Most riders can pull off a tire, pop in a tube, and get it aired up in case of a flat (always remember to check the inside of the tire for thorns before tubing it up!). But larger holes or slices in a tire may require a bit more labor. On an old tire, practice installing tire plugs. These are absolutely magical for quickly fixing tire punctures in both the tread and along the bead in the case of a pinch flat. Also try booting and/or sewing up a sliced sidewall. This is an all-to-common tire injury when riding a loaded bike on rocky trails, but stitching up a slice with a thick needle and upholstery thread can make the tire completely useable again. Sometimes, stitching a boot to the back of the slice can even allow the tire to be returned to tubeless.
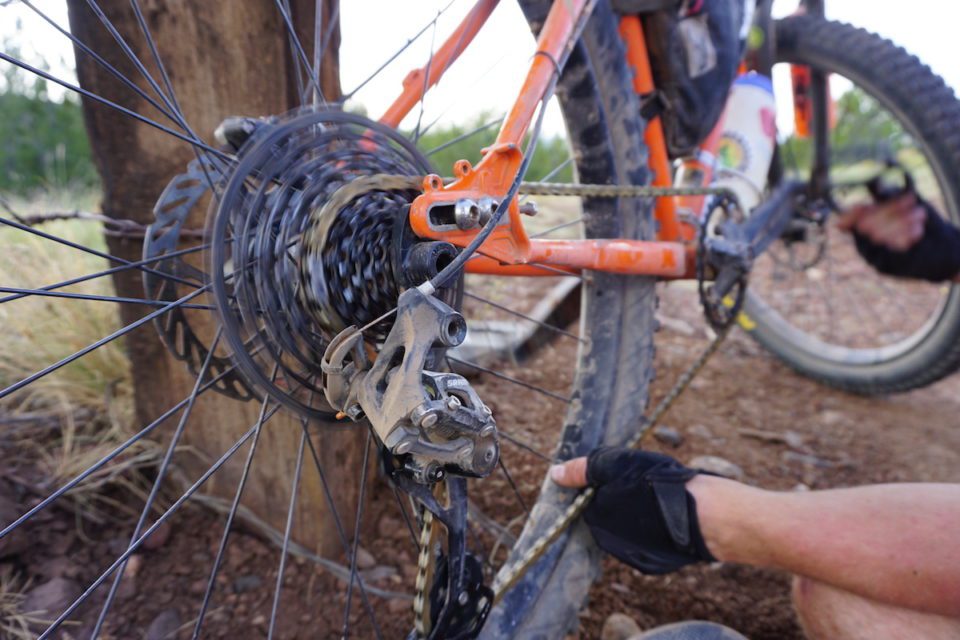
Practice replacing a derailleur hanger and adjusting the shifting on a rear derailleur. Make sure to understand the difference between adjusting shift cable tension and the limit screws – many poorly-adjusted derailleurs are the result of someone mistakenly altering limit screw position instead of cable tension.
On an old chain, make sure that your hands are strong enough to break it open with your multi-tool. I often have to use my mini pliers for more leverage. Then put the chain back together with a quick link for practice.
Be able to replace brake pads, spread the caliper pistons out, adjust the caliper position relative to the rotor, and straighten a bent rotor. All are surprisingly straightforward tasks after just a bit of practice.
Like so many other things in life, the more practice and experience one has maintaining and repairing bikes, the easier and less stressful the task will become.
Plus, it can be kinda fun repairing your bike trailside.
2 comments
Your article helped me a lot, is there any more related content? Thanks!
Hi my loved one! I wish to say that this post is amazing, nice written and come with approximately all significant infos. I would like to peer more posts like this.